Customers and customer groups
Keep a list of your customers to put their name on receipts, issue tax invoices to businesses with their VAT number and address, and give regular customers an automatic discount. Customers are managed under Sales › Customer Management, in Customer Groups and Customers.
Customer groups
Every customer belongs to exactly one group. A group's Discount (%) is given automatically at the till on every item sold to its customers. Every shop starts with a group called "General" at 0%; new customers go there unless you choose otherwise.
Add a group
- Open Sales › Customer Management › Customer Groups and choose Add customer group.
- Enter a Name (for example "Loyalty gold") and the Discount (%), from 0 to 100. The form shows what it means, for example "An item of 100.00 sells for 80.00".
- Save.
Each group card shows its discount (or No discount) and its customers; Show the customers of this group opens the customer list filtered on it. A group that has customers cannot be deleted ("This group has customers and cannot be deleted."): move its customers first.
Customers
Open Sales › Customer Management › Customers. The list shows each customer with their Customer group, Contact, Tax number, what they Owe (see Customer balances and payments) and Sales. Use the Customer group filter and the search box to find someone.
Add a customer
-
Choose Add customer.
-
Fill in the sections:
Section Fields Customer group The group, and so the discount ("The group's discount is given on every item at the till.") Customer Name (required) and Company name, printed on receipts and invoices Contact Phone number (required: 05XXXXXXXXor9665XXXXXXXX, both stored the same way), Email address, Birth date (for birthday offers; only the day and month are used)Tax and registration Tax number (15 digits, starting and ending with 3; the hint says Looks right when it is valid) and Commercial register (10 digits). Optional, needed for a tax invoice to a business National address Building number, Street, District, City, Post code (5 digits), Additional number, Region, Country: the address on the customer's tax invoices -
Choose Save.
Phone number, email, tax number and commercial register must each be unique in your shop. A customer who has sales cannot be deleted ("This customer has sales and cannot be deleted.").
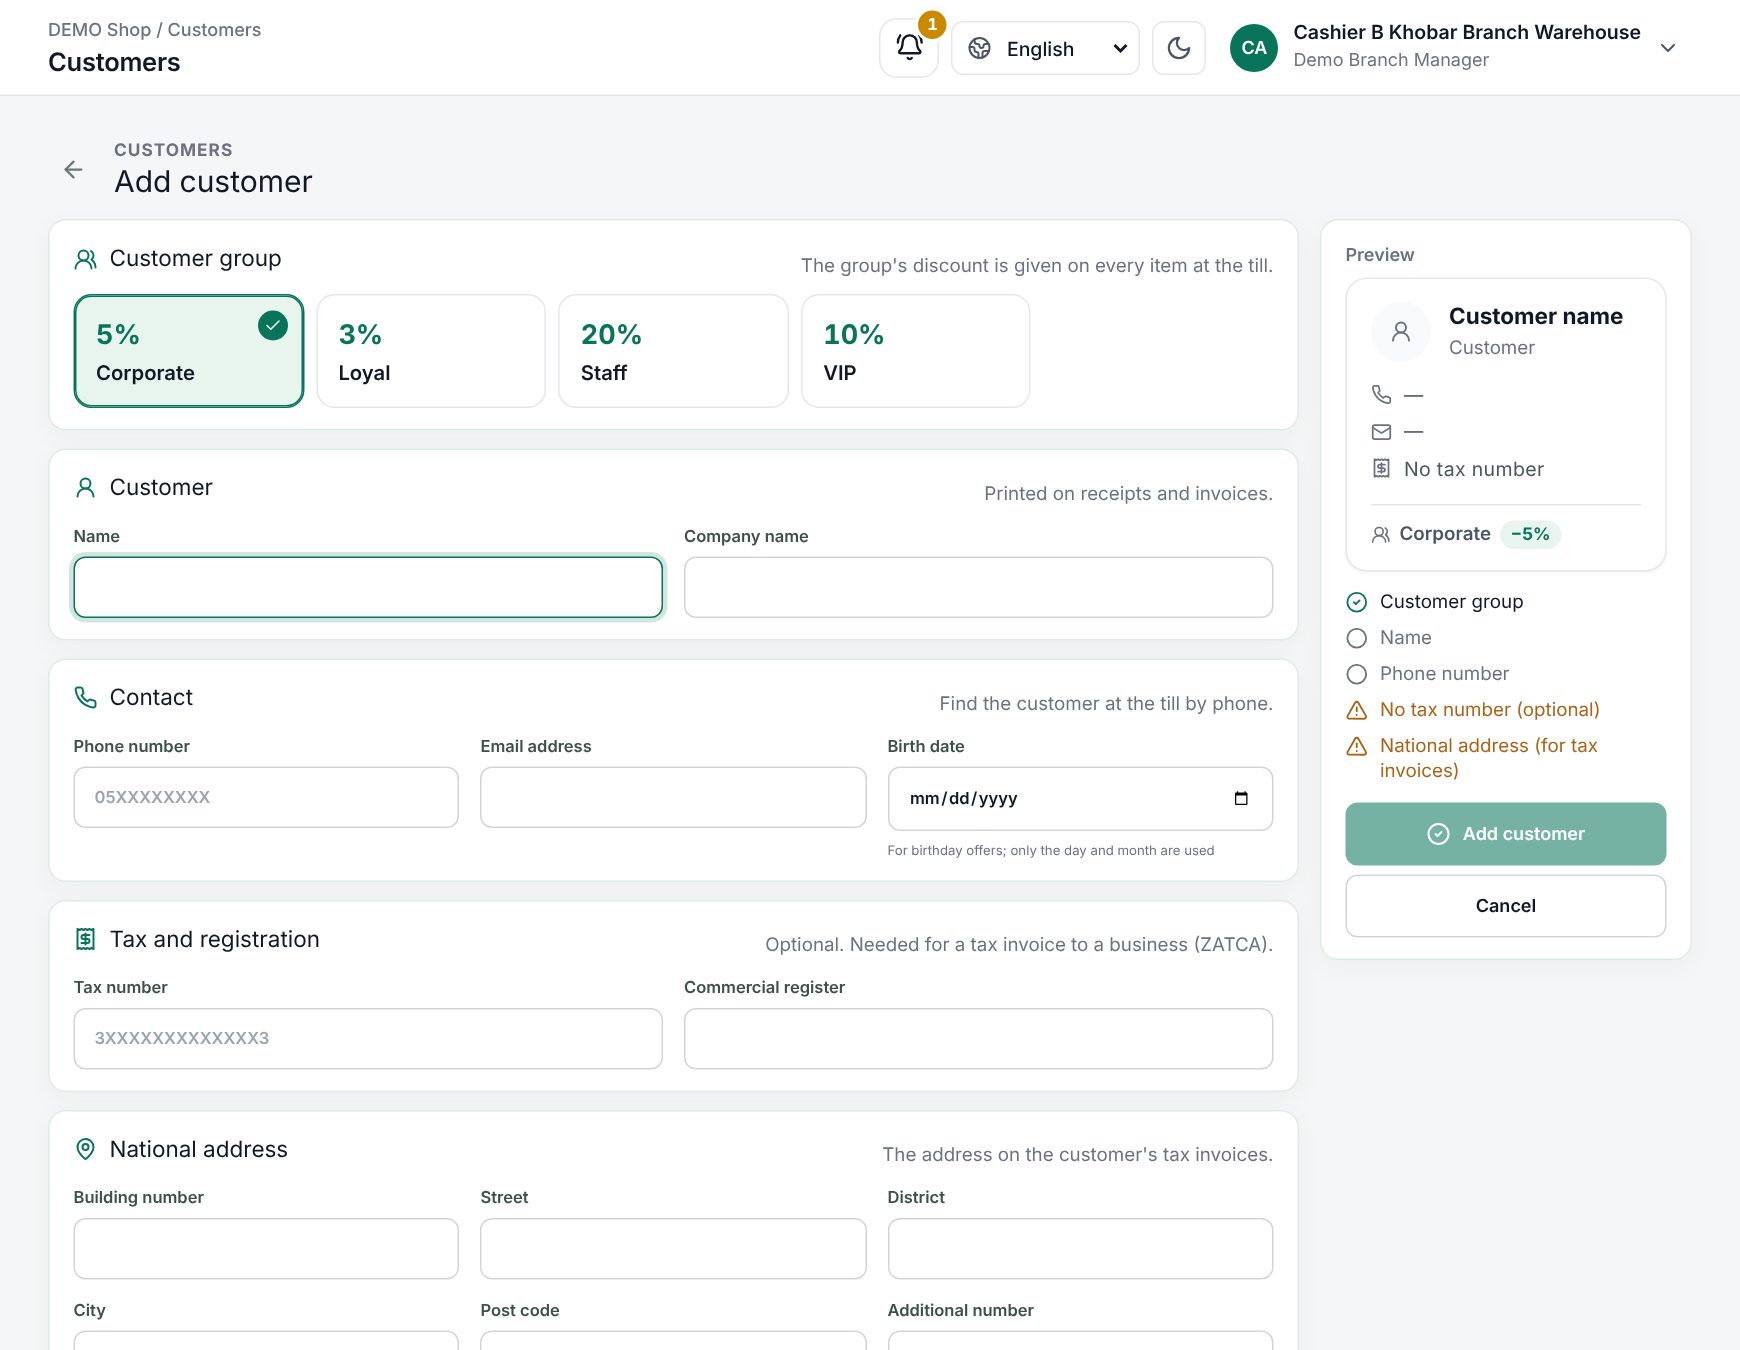 The customer form with group, contact, tax number and national address
Import and export
The export button downloads your customers as an Excel file. Import customers brings them in from another system. The file needs these columns:
customer_group, name, company_name, email, phone_number, address, city, state, postal_code, country, password, tax_no, cr_no
customer_groupmust be the name of an existing group: create the groups first.- Phones as
05XXXXXXXXor9665XXXXXXXX; both forms of one number count as one customer. tax_nofollows the same rule as the form. Thepasswordcolumn is ignored.- All or nothing: if any row is invalid, nothing is imported. Duplicates inside the file are reported with their row numbers.
What happens at the till
- Choose Add customer at the top of the order ("For discounts and points"), or press F4.
- The Customer dialog opens on Find customer. Type at least 2 characters of a name, phone, email or VAT number, or pick from Recent customers. Each result shows the group's discount, for example 20%.
- Not found? Switch to New customer: type the Name and Phone number (More details adds Email, Birthday, Company name and VAT number) and choose Save and add to order. The till confirms Added to the order. Adding customers needs a connection; offline, only customers already used on this till can be found.
Once chosen, the button shows the customer's name with the discount (−20%), their points if the shop uses loyalty points, or their phone. The × (Remove customer) or Walk-in customer in the dialog takes them off.
What changes:
- Prices: every line drops by the group's percent, at once. Lines on a promotion piece and items of a price list that says so are left out. The group discount comes after promotions and before the cashier's line discount and coupons, and does not count toward the cashier's limit.
- Each line shows You save, and the totals show the Discount row.
- Receipt: the customer's name and, if set, Customer VAT. With ZATCA Phase 2, a customer with a VAT number and a complete national address (4-digit building number, street, district, city, 5-digit post code) gets a Tax invoice instead of a Simplified tax invoice.
- Accounts and points: a customer is needed to sell on account and to earn or spend points.
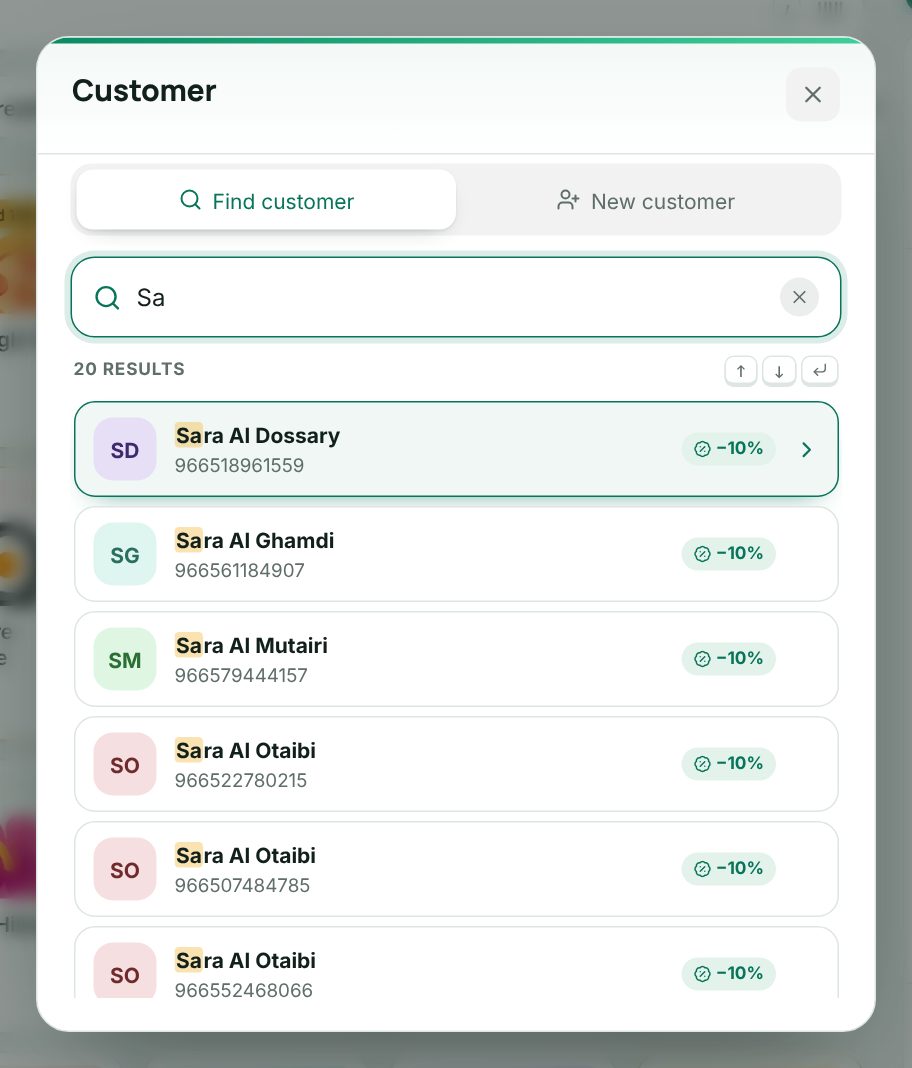 The customer dialog at the till
Worked example: a staff discount
A bakery has a "Staff" group with 20%. A staff member buys a sandwich at 17.25 and a juice at 5.75 (with 15% VAT: 15.00 + 5.00 = 20.00 before VAT).
| Totals | Walk-in | Staff member |
|---|---|---|
| Subtotal | 20.00 | 20.00 |
| Discount | −4.00 | |
| VAT 15% | 3.00 | 2.40 |
| Pay | 23.00 | 18.40 |
Nobody types a discount: picking the customer is enough. The sandwich line shows You save −3.45 and the juice −1.15.
Adding a customer to an order at the till
Who can manage customers
Reading, creating, editing and deleting customers and customer groups each have their own permission (for example customer_read, customer_group_read). Cashiers with POS access can find and quick-add customers at the till without these pages. See Users and permissions.
Related pages
Last updated 17 Oct 2026