Tables and floor plan
Restaurants seat guests at tables, take orders in rounds, and split, move or merge bills. You draw the floor plan once in the back office; every till then shows the same live floor, with each table drawn with its chairs, how long guests have been seated and what they have ordered so far. A change made on one till appears on the others at once.
Tables are part of the restaurant setup. They are available to shops of the restaurant (hospitality) type, and the back-office page needs the tables permission.
How a table order works
An order on a table is called a check. A check is a held order (a draft, see Drafts and held orders) that belongs to a table and records the number of guests.
- Each round the waiter sends is a save of the same check. The kitchen receives only what changed since the last round (see Kitchen stations and printers).
- A table can hold several open checks (check 1, 2, 3 …), for example when guests want separate bills.
- Paying the check turns it into a sale that keeps the check's order number, so the kitchen ticket and the receipt match.
The state of a table is worked out from its open checks, so it is never wrong after a bill is paid on another till:
| State on the till | When |
|---|---|
| Free | No open check |
| Seated | At least one open check |
| Bill printed | Every open check has had its bill printed |
The Tables page
Open Restaurant Management › Tables. The top of the page counts your Tables, Seats, Dining areas and VIP tables. If you have more than one warehouse, choose it in the Warehouse list.
Each table is drawn from above, to scale, with its chairs: round tables have chairs all the way round, square and long tables along both sides. A crown marks a VIP table, and a dot shows a table where Guests are seated.
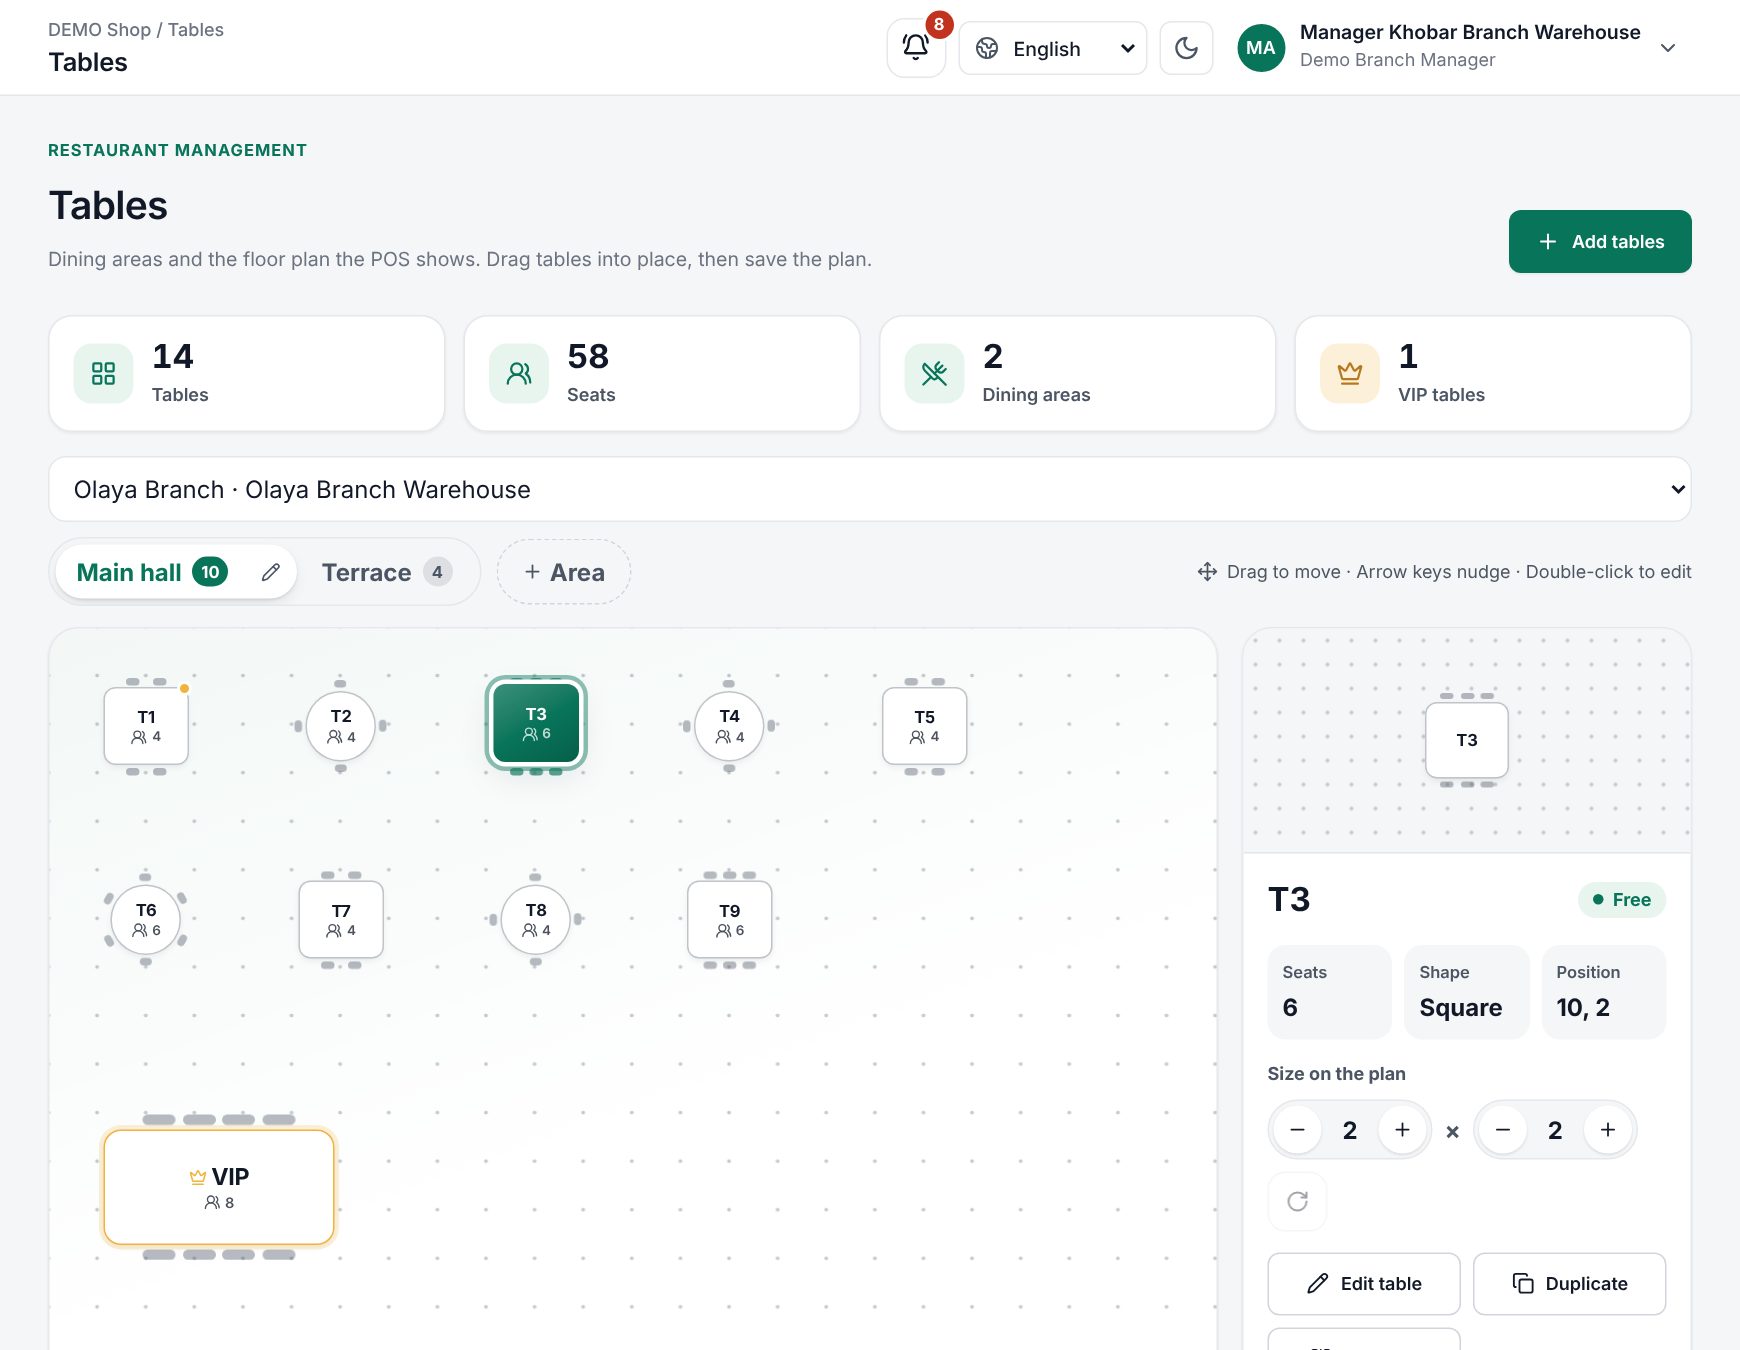 The Tables page with dining areas, the floor plan and a selected table
Set up dining areas
Areas are the rooms or zones of a warehouse, such as Main hall or Terrace. They appear as tabs above the floor plan.
- Click + Area next to the area tabs.
- Enter a Name, or pick a suggestion: Main hall, Terrace, Family section, VIP lounge or Outdoor. Save.
- To rename or delete an area, click the pencil on its tab.
Deleting an area keeps its tables; they move to the No area tab. If you have no areas at all, the tables appear under Main room.
Add tables
- Click Add tables.
- Choose One table or Several tables:
- One table: enter a Name, what waiters call it, such as T4 or Window 2. Each name must be unique in the warehouse.
- Several tables: enter Name starts with, First number and How many. For example T, 1 and 12 creates T1 to T12. The dialog lists the Names it will create and warns Some of these names are already used.
- Pick a Shape: Square, Round or Long.
- Set the number of Seats with − and +.
- Under Size on the plan, set Width and Depth, or use Turn to rotate a long table. The size follows the seats by itself (Auto); if you changed it by hand, Auto size puts it back.
- Choose the Area, and switch on VIP table if needed.
- Check the Preview, drawn to scale with its chairs, and save.
Tip: if you set many seats on a small table, the dialog shows That's a lot of seats for this size.
Arrange the floor plan
The plan is a grid that matches your room.
- Drag a table to move it, or select it and nudge it with the arrow keys. The hint under the plan reads Drag to move · Arrow keys nudge · Double-click to edit.
- Double-click a table to edit its name, seats, shape, size or area.
- Select a table to see its details on the right: Free or Guests are seated, Seats, Shape, Position, and Size on the plan with Width, Depth and Turn you can change right there. Edit table and Duplicate are below.
Moved tables are marked Not saved yet, and a bar at the bottom counts the tables changed. Click Save floor plan to keep the layout, or Discard to undo. If two tables overlap, the plan cannot be saved until you move them apart (Tables overlap: move them apart first.). Save or discard before switching to another area (Save or discard your changes first.).
A table where guests are seated cannot be deleted (Guests are seated at this table: it cannot be deleted now.). A table that has been used before is switched off instead of deleted, so its history stays.
What happens at the till
On the POS, choose Tables in the header (it needs a connection). The Tables window is live from every till.
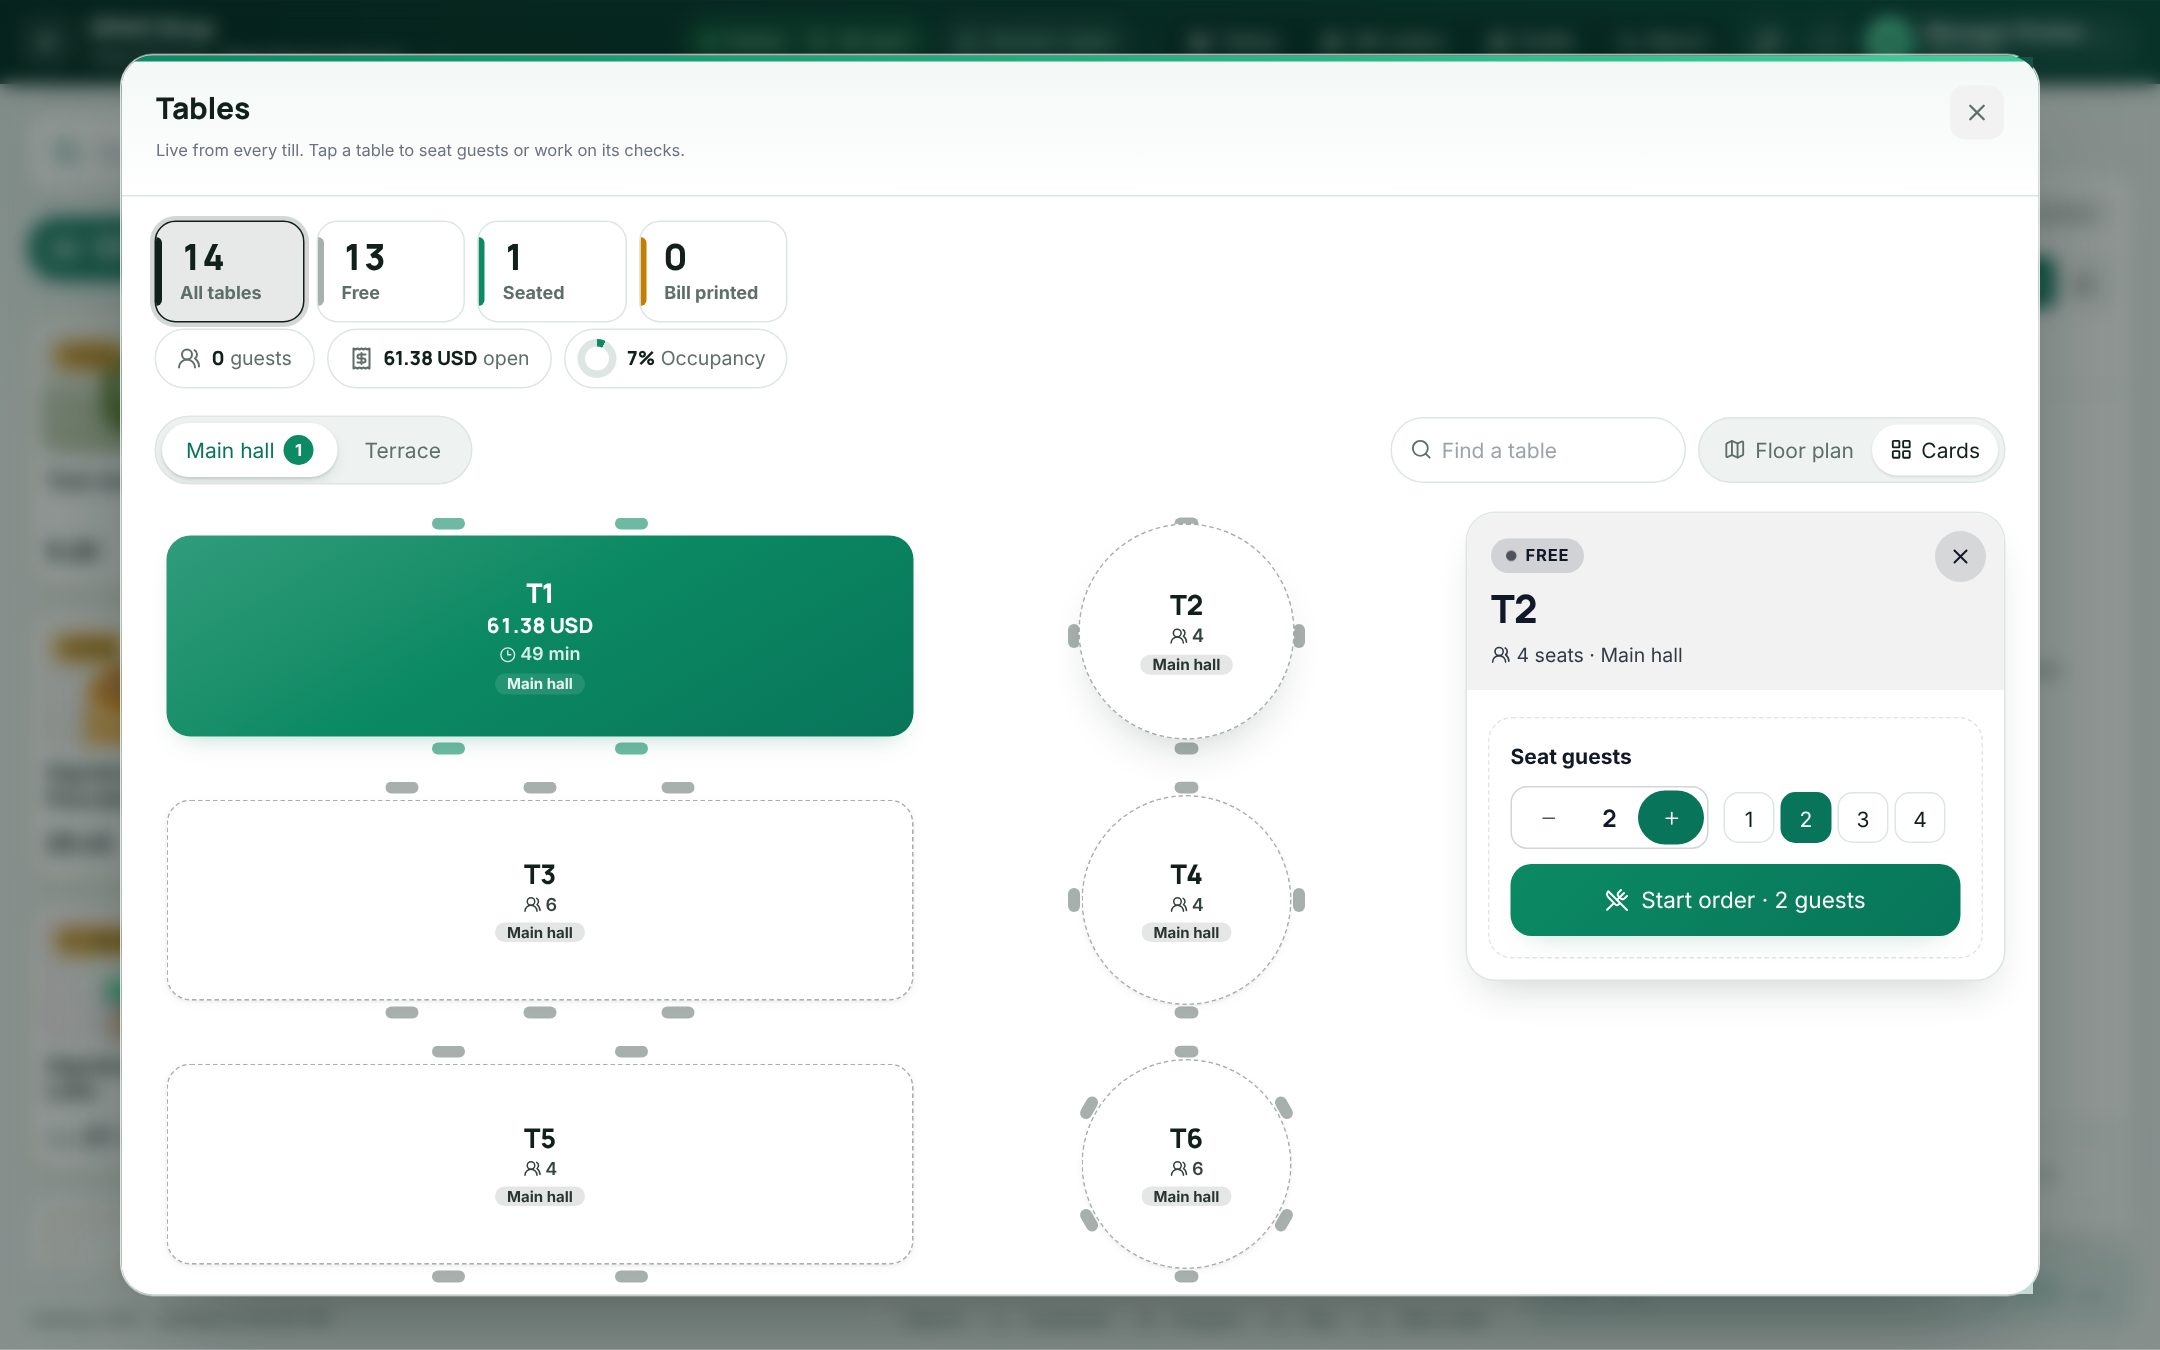 The Tables window on the till with the status strip, the floor plan and Seat guests for a free table
At the top, a strip counts All tables, Free, Seated and Bill printed; tap one to show only those tables. Next to it you see dishes ready to serve, the number of guests, the money open on checks, and the Occupancy.
- Switch areas with the area tabs, or type in Find a table to search every area.
- View: Floor plan draws the room as in the back office; Cards shows the tables as a grid of cards (better on small screens). The till remembers your choice.
- A seated table shows its total, how long guests have been there (the timer turns warmer after an hour and an hour and a half), and guests out of seats. Badges show the number of checks, dishes ready in the kitchen, and QR orders waiting.
Seat guests and send rounds
- Seat a table. Tap a free table. Under Seat guests, set the number of guests with − and + or a quick number, then choose Start order. If there are more guests than seats you see More guests than seats at this table. The cart now shows the table.
- Send a round. Add the items and tap Send. The new items go to the kitchen.
- Add more later. Tap the seated table and choose Open on its check, add items and Send again. Only the new items print; removed items print as VOID.
- Serve. When the kitchen marks dishes ready, the check shows n ready and a Served button. Tap it once the food is on the table.
- Print the bill. Choose Print bill on the check (Print bill again after the first time). This is a pre-bill marked "Not a tax invoice". Changing the check after the bill was printed clears the billed state.
- Pay. Open the check and pay as usual (see Taking payment).
To start another check on a seated table, use New check in the same panel.
Split, move and merge
Each check in the table's panel shows its number, order number, items, guests, who opened it, Bill printed and In the cart when it is the order on your screen, with these actions:
| Action | What it does |
|---|---|
| Split | Moves chosen items and quantities to a new check on the same table. The check needs at least two items. Something must stay on the old check; to move everything, use Move |
| Move | Moves the check to another table: the till asks you to choose the table next. The kitchen gets a short note |
| Merge checks | When the table has several checks: merges this table's checks into one |
| Merge table | When the table has one check: brings another table's checks onto this one. Choose the other table next |
Guests are added up and notes joined when checks merge. What the kitchen already has moves with the items, so nothing is cooked twice after a split or merge. A check with an amount discount on the whole bill must have that discount removed before it is split or merged; a percentage discount is kept on both checks after a split.
To split a bill evenly instead, pay the check and use Split evenly in the payment dialog.
Who can see and change checks
A cashier normally sees only their own held orders. Checks on tables are the exception: everyone who works the POS in that warehouse sees them and can add rounds, because waiters take turns at a table. Voiding a check stays with the waiter who opened it, or someone allowed to delete drafts.
If a check changed on another till after you opened it, or it was already paid, merged or deleted, paying it is refused so the guest is not charged twice. Reopen the check and try again.
Worked example: one table, two bills
A café sells cappuccinos at 15.00 and croissants at 9.00 (VAT included). T3 is seated with 4 guests:
- First round: 2 cappuccinos and 2 croissants. The check total is 48.00 and T3 shows 48.00 on the floor.
- Second round: 1 cappuccino. Only it prints at the bar; T3 now shows 63.00.
- Two guests pay apart: Split moves 1 cappuccino and 1 croissant (24.00) to check 2. Check 1 keeps 39.00; T3 still shows 63.00 in total and a badge 2 checks.
- Check 2 is paid: 24.00. T3 shows 39.00. When check 1 is paid, T3 goes back to Free. Each receipt carries its check's own order number.
Example
A café seats four guests at T3: the waiter taps T3, picks 4 and Start order, then sends two cappuccinos and two croissants. Later a third cappuccino goes out; only that coffee prints at the bar. When the kitchen marks the croissants ready, T3 shows a ready badge and the waiter taps Served. At the end two guests want to pay separately, so the waiter uses Split to move their items to check 2, and each check is paid on its own.
Related pages
Last updated 17 Oct 2026