Users, roles and permissions
Everyone who signs in to your school has a user account: staff sign in with the school code, their email and a password; guardians and students usually sign in with their mobile number and an SMS code. What each person may see and do comes from their roles. Infotech School comes with built-in roles for every common job, and you can add your own.
You find both pages under Users & permissions: Users (needs user:read) and Roles & permissions (needs role:read).
The user list
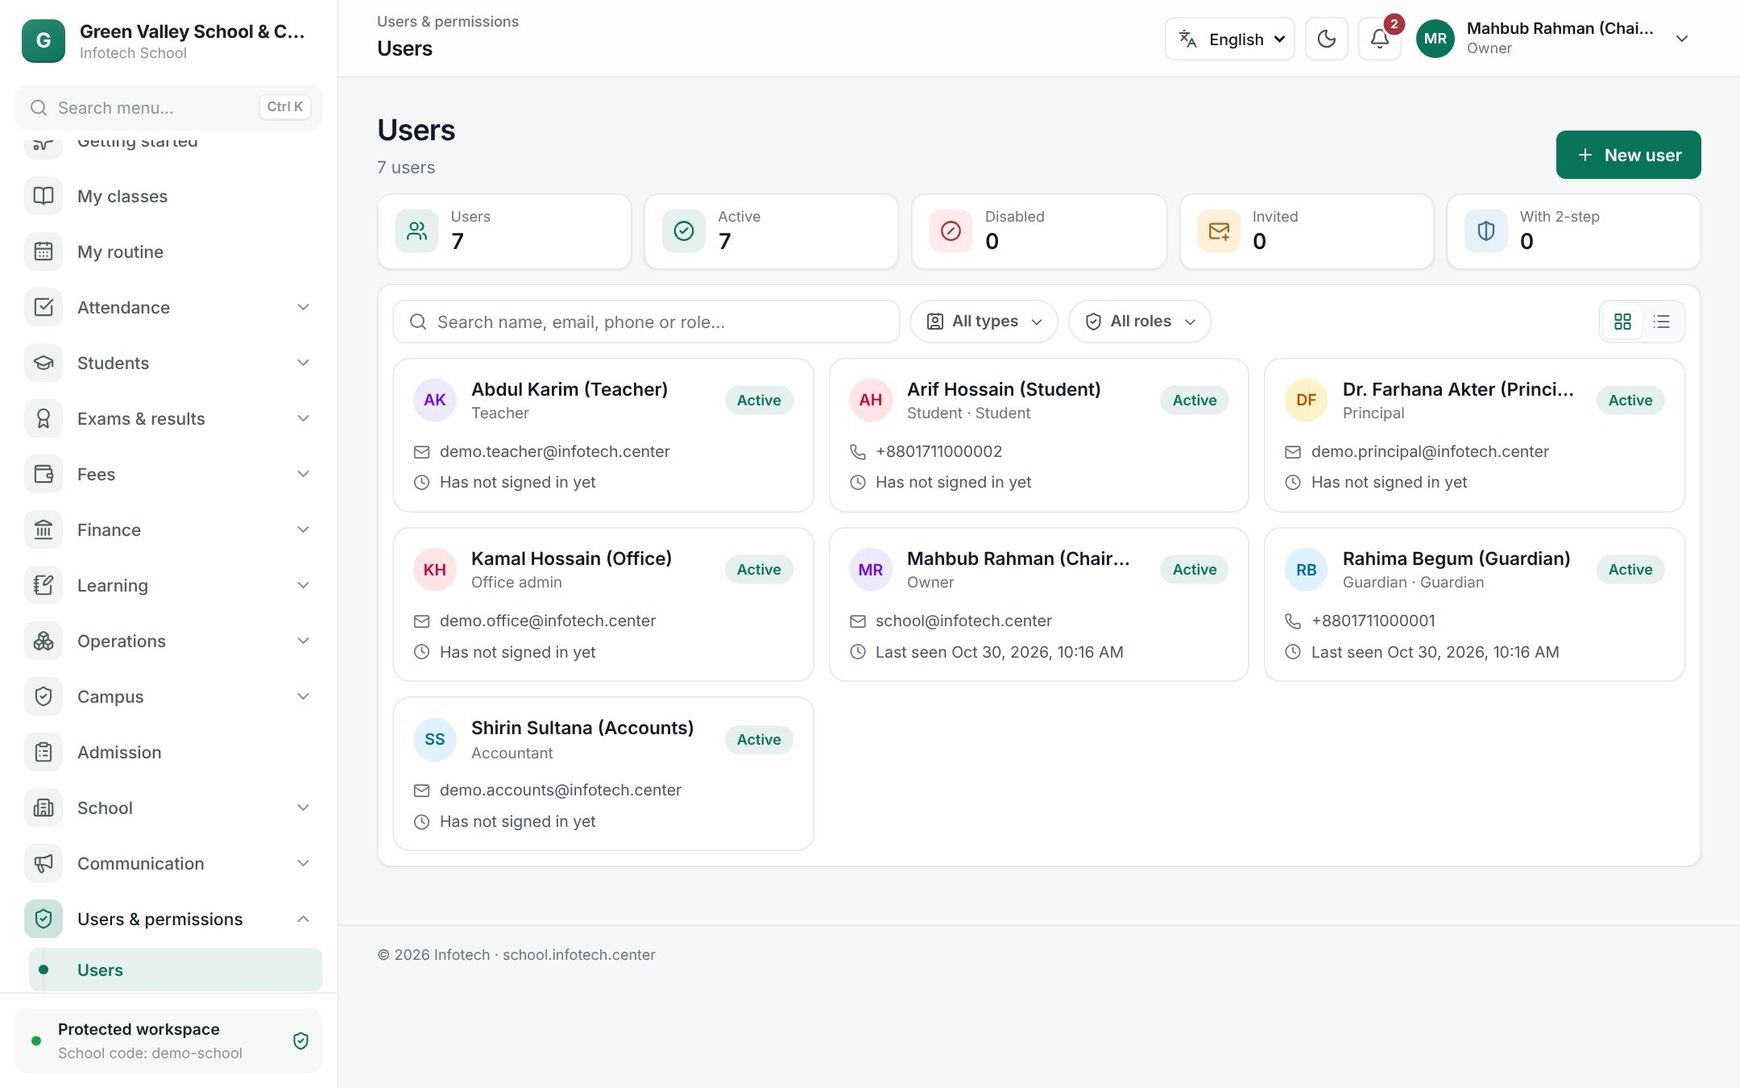 The user list with filters for account type and role
Open Users & permissions › Users. The counters at the top (Users, Active, Disabled, Invited, With 2-step) also work as quick filters. Search by name, email, phone or role, and filter by Account type (Staff, Guardian, Student) or Role.
| Column | Shows |
|---|---|
| User | Name, email or mobile |
| Roles & permissions | The person's roles |
| Two-step verification | On or Off |
| Last sign-in | When they last signed in |
| Status | Active, Invited (invitation sent, not joined yet) or Disabled |
Add a user
Choose New user (needs user:write: Owner, Principal, Office admin).
- Choose the Account type: Staff, Guardian or Student. The matching built-in role is picked for you.
- Fill in Name, then:
- Staff: Email (required; it is how they sign in) and Mobile (optional).
- Guardians and students: Mobile number and/or Email (optional).
- Choose how they get in (below).
- Under Roles & permissions, tick at least one role. The permissions of all chosen roles add up.
- Choose Create user.
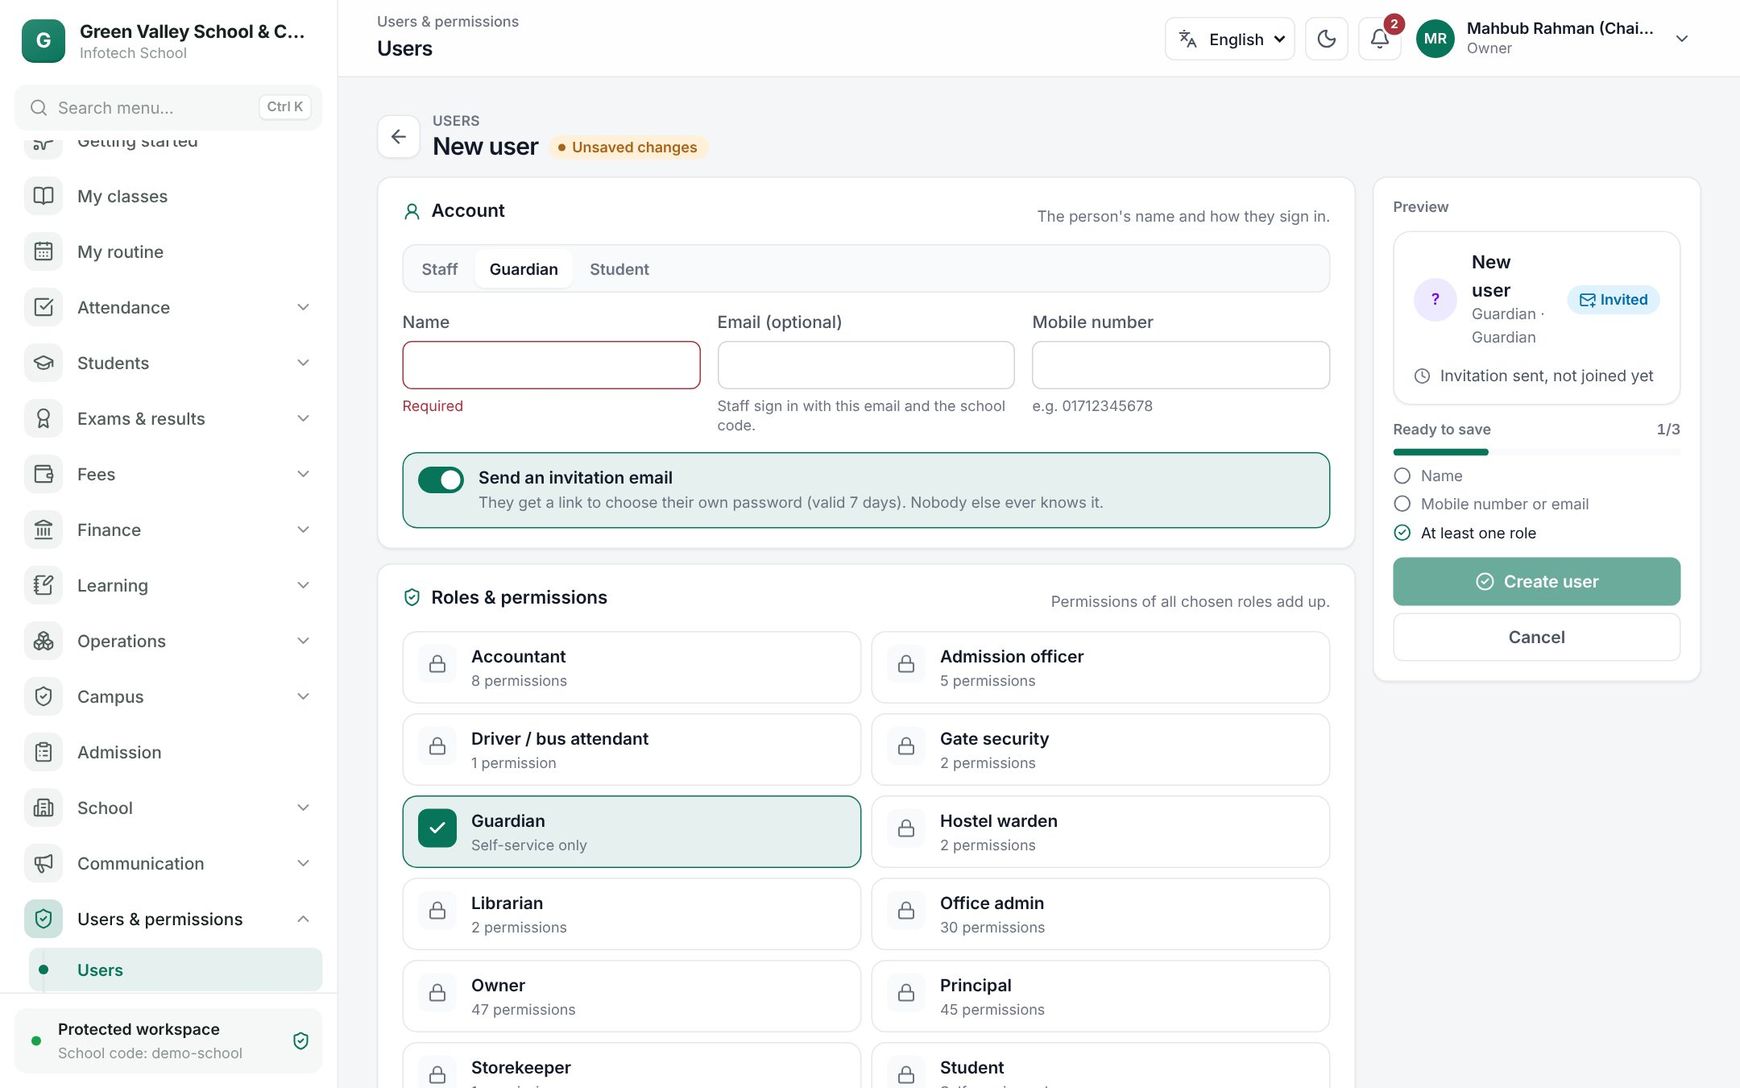 A new guardian account that signs in with an SMS code
| Way in | When | What happens |
|---|---|---|
| SMS code | Guardian or student with a mobile number | They sign in with that number and a code sent by SMS; no password to remember |
| Send an invitation email (on) | Staff, or anyone with only an email | They get a link to choose their own password. The link works for 7 days |
| Temporary password | Send an invitation email switched off | Type or generate a password (at least 10 characters, with a letter and a number) and share it in person or by phone. They must choose their own at the first sign-in |
Tip: Guardians and students usually get their sign-in from their own record: use Create sign-in on the guardian or student page (see Guardians). Teachers can get one with Give a sign-in on Teachers & staff.
Change, block or help a user
Open a user to change their name, mobile number or roles, then Save changes. The sign-in email cannot change. On the right:
- Can sign in: switch off to block the account at once. The person is signed out on all devices. You cannot disable your own account.
- Resend invite: a new invitation link; the old one stops working.
- Reset password: sets a new temporary password (one is generated for you). The person is signed out everywhere and must choose a new password at the next sign-in.
- Reset 2-step: turns off 2-step verification for someone who lost their phone. They can turn it on again from Security.
Built-in roles
| Role | For |
|---|---|
| Owner | Chairman or proprietor: everything, including users, roles, settings and billing |
| Principal | Runs the school: academic work, students, staff, exams, fees, finance, settings (but cannot change roles) |
| Office admin | Users, students, staff, routine, attendance, notices, SMS and day-to-day records |
| Admission officer | Admission forms, applicants, test marks, merit lists, lottery |
| Accountant | Fees, collections and expenses; sees students and staff. Approvals stay with the principal |
| Teacher | Own classes: attendance, marks, homework, conduct, question bank |
| Librarian, Hostel warden, Storekeeper | The library, a hostel, the store and asset register |
| Driver / bus attendant | Runs the trips of their vehicle from the phone |
| Gate security | Visitor log and checking who collects a child |
| Guardian, Student | Self-service only: their own children, or their own routine, homework and results |
Built-in roles cannot be changed or deleted.
Custom roles
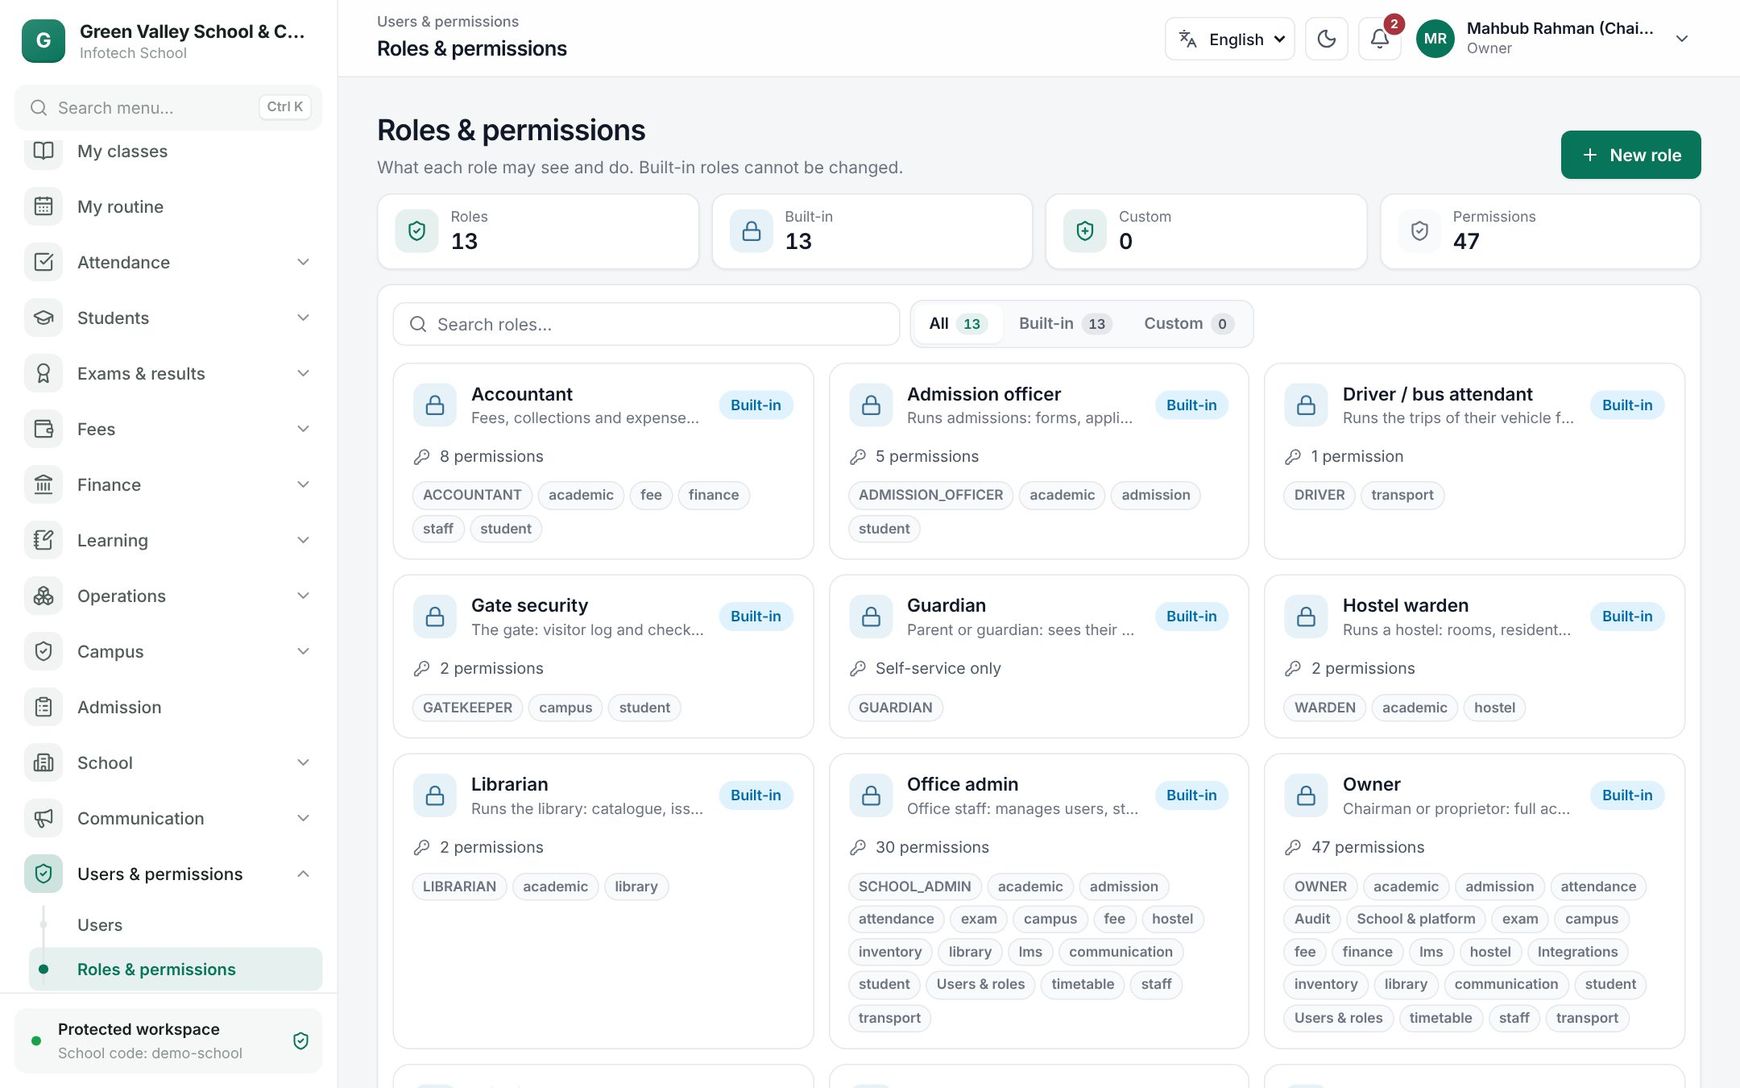 Built-in and custom roles with their number of permissions
Open Users & permissions › Roles & permissions and choose New role (needs role:write, which only the Owner has).
- Give a Name (for example "Exam controller"), a Code (fixed later) and an optional Description.
- Under Permissions, tick what the role may do. Each group has Select all and Clear.
- Choose Create role.
To remove a role, open it and choose Delete role. A role that people still have cannot be deleted: give them another role first.
Rules that keep the school safe
- You can only give what you have. You cannot add a permission to a role, or give someone a role, unless you hold all its permissions yourself. Greyed permissions show "You don't have this permission yourself, so you can't give it."
- Only an owner manages an owner. Other admins cannot reset an owner's password or 2-step, or change an owner's roles.
- The last owner rule. The school must always keep at least one active owner. Removing the Owner role from, or disabling, the only active owner is refused with "The school needs at least one owner".
- Role changes reach a signed-in person within 15 minutes, or when they reload.
Example
Green Valley School wants Kamrul Hasan to run exams without seeing fees. The owner creates the role "Exam controller" with the exam permissions (exams, marks, result publishing), then opens Kamrul's user, ticks Teacher and Exam controller, and saves. Kamrul keeps his teaching pages and now also manages exams.
Last updated 30 Oct 2026